There are 4 steps to install and setup Buying Buddy on your WordPress website:
- Get a Google Map API Key.
- Install the Buying Buddy WordPress plugin.
- Create 2 new web pages and add the “results” and “details” widget short codes to them.
- Confirm that the websites settings in your Buying Buddy account match the pages you just created.
This article provides detailed instructions to guide you through these steps.
Step 1: Get your Google Map API Key
A google Map API Key is required.
- Follow these instructions to get a Google Map API key.
When you have created your Key, make sure it is added to Website Settings in your Buying Buddy account before proceeding with the next step.
Step 2: Add Buying Buddy Plugin to your Site
Support for WordPress Themes
The Buying Buddy WordPress Plugin will work on any WordPress theme.
However, see Specific Additional Notes for Themes below, which includes:
DIVI Theme.
Get the Plugin ZIP file:
- Download the latest Plugin ZIP file using the button and link above.
You should ‘save’ and not ‘open’ so you download the .zip file to your computer.
The file needs to stay in .zip format to upload it to your WordPress website.
Install and configure plugin:
- Go to your WordPress admin panel.
Select “Plugins / Add New”.
- Click the “Upload Plugin” button.
Browse for the “Buying Buddy — WordPress.zip” file you previously downloaded, and click the “Install Now” button to upload and install it.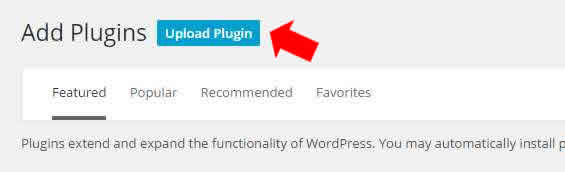
- After it is installed, you should click the option to “Activate” the plugin.
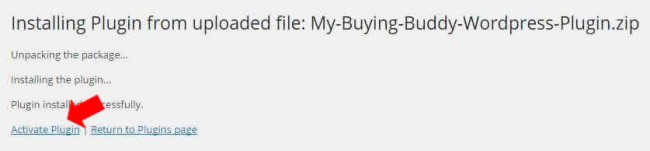
- After successful activation, you will be redirected to the Buying Buddy plugin’s settings panel (see below) where you MUST enter the following two codes:
- Your unique Buying Buddy Account ID (ACID) code.
You can obtain your Account ID code from within your Leads and Contacts account in the Widgets menu. - Google MAP API Key. This is required
Ensure your Google Map API key has been added to your LAC account
You can also add the Map API Key to the plugin.
- Your unique Buying Buddy Account ID (ACID) code.
Plugin Settings
The following settings are shown in the Buying Buddy Plugin Options panel on your WordPress admin. See instructions below:

Required Settings
- Buying Buddy Account ID (ACID)
This field is required. - Google Map API key
Google Maps will only work if you specify a Google Map API Key.
If the Buying Buddy plugin is being used to load Google Maps API (the normal case) then the Google Map API KEY should be added to the Website Settings in your Buying Buddy account.
If your WordPress theme loads Google Maps (e.g. DIVI Theme, Real Spaces etc) you must adjust this setting.
The Buying Buddy WordPress plugin will then refresh settings (including the Maps API Key) from your Buying Buddy Account settings on a daily basis.
There is no need to add the API Key to the Buying Buddy WordPress Plugin unless you need to utilize the API Key immediately. Otherwise, by waiting 24 hours, the plugin will be automatically updated with your Google Map API Key from your Buying buddy dashboard.
If you need the immediate effect of the Google Map API Key then add to the Plugin Settings panel as shown above.
Optional Settings
- Load Buying Buddy Plugin
You may set this to NO to temporarily turn off the plugin on all pages, which can be handy for troubleshooting. - Only Load Buying Buddy Library on specific pages / posts
This option allows you to load the Buying Buddy Plugin on specified Pages. Specify a comma separated list of WordPress page/post IDs.
e.g. “123,45,67,789” - Load Google Maps Library
You may set this to NO to avoid duplication errors if your WordPress site or another plugin already loads Google maps with an API key.
For example, the DIVI Theme will load Google Maps API and so the Buying Buddy plugin should NOT load Google Maps API (scroll down to see notes on DIVI theme) - BFG Express Site
This option ONLY applies if you have an office account with the “Express Site” feature.
Step 3: Add Foundation Pages with Widgets
Step 3a: Add 2 Foundation Pages
You need to create and identify 2 key pages to be in your Buying Buddy account:
- Results Page (with the “Results” widget)
- Property Details Page (with the “Property Details” widget)
These pages should NOT be added to your main navigation menu
- Go back to your WordPress dashboard account and create two BLANK PAGES.
We suggest you give them appropriate slugs, such as “results” and “details”.
Step 3b: Insert Buying Buddy Widget Code to Display Widgets
- Next, select your new “results” page to Edit it
- Paste the following short code for the Buying Buddy “Results” widget.
For example – in the image below this is the Results widget added using the block editor.
If you are using a standard text editor, just add the short code as regular text.[mbb_widget id="MBBv3_ListingResults"]
- SAVE your page.
- VERIFY. Once you have SAVED this page, preview it to see Buying Buddy results widget being displayed on the authorized domain (this will not display if you are using a sandbox development domain).
Excellent! You have set up the Results Foundation Page. - NOW REPEAT the above steps to setup your Details page
** Do not forget to do this! **
The Widget short code to use is:[mbb_widget id="MBBv3_SearchDetails"]
Note: The details widget may display a SQL error if you preview it – ignore this.
Excellent! You have now set up the Details Foundation Page. - Finally, paste the Search Form widget to any other page using the process described above (this is for testing the search – this is not a foundation page).
The Search form short code is:[mbb_widget id="MBBv3_SearchForm"]
Before testing – complete the next step!
Step 3c: Configure your Buying Buddy account so that page names match
It’s important that the Buying Buddy system knows the page address you used for your Foundation Pages, as Buying Buddy needs to know where to go to show search results, and where to direct your leads (via emails etc.) to see search results and details of a specific property.
So, in this step, you will add the page addresses to the Website Settings in Buying Buddy.
- In your Buying Buddy dashboard, from the current “Get Widgets” page, click the link at the top of the page to go to Website Settings.
Or, [nav]Widgets > Website & Settings[/nav]
Then click the “Website Settings” link for your website. - Scroll down to section “4. WIDGET FOUNDATION PAGES” to review the page addresses of the Widget Foundation pages
- Check the page names shown and update them if needed.
You will see that they are probably shown as just results and details. If the details and results pages are using different slugs, then you need to change these to say the actual names of the pages you created.
NOTE: Use the actual page names for YOUR site – don’t assume that they are the same as shown in this example!

Troubleshooting
“SQL Error” on Details Page
If you see this message then this is because you are attempting to view the Property Details widget on a page on its own without a reference to a property! Ignore this, the widget is installed correctly and this error is never seen.
“Sorry this domain is not authorized”
If you see a message that says “Sorry this domain is not authorized“, then this means that the Widgets and Plugin are indeed working correctly, BUT that your page address is a domain that is not authorized to display Buying Buddy Widgets. It is probably a staging / development domain.
There are two options for dealing with this:
- Make sure your actual domain name is applied and working – and then view the “live” site in which case widgets will be displayed correctly. You can then choose to ignore this message while in development.
- If you need to do more extensive development then you can request (via Help Desk) to add your staging / development domain as an extra (free) “authorized” domain on your account.
We call this a ‘sandbox’ development URL and it would be authorized temporarily while you do development.
Widget Layout Is Jumbled and Unorganized
See Troubleshooting Installation FAQs.
Doing More
Your WordPress site editor will allow you to create custom search forms and use all the capabilities of the Buying Buddy widgets.
Some example that you may like to consider include;
- Adding a Featured Listings page to display your own listings
- Showing your Sold properties
- Creating neighborhood pages with properties for neighborhoods
- Adding lead capture forms that send leads directly to the Buying Buddy CRM
- Adding a general contact form widget
- and a lot more!
You can now use Widget Themes to style widgets – or even add custom CSS too if you wish to.
See our demonstration websites for ideas and inspiration
- https://charliesmithrealty.com (WordPress)
- https://charliesmithrealty.net (HTML / php)
If you need more help please contact us.
Notes for Specific WordPress Themes / Builders
DIVI Theme
The latest versions of the DIVI theme loads Google Maps API. You STILL require a Google Maps API key – but this should be applied to your DIVI theme as follows:
- Prevent Buying Buddy plugin from loading the Google Maps API.
In the WordPress Plugins menu:
Click “settings” for the Buying Buddy plugin.
Under “Option Settings”, make sure you DISABLE (YES) the loading of Google Maps API by the Buying Buddy plugin.
Click “Update Options”. - Add your Google Maps API Key to the DIVI settings
In the WordPress DIVI menu – go to “Theme Options” and then add your Google Map API key to the “Google API Key” field as shown below, and “Save Changes”.
You may need to clear any cache.
Real Spaces Theme
The Real Spaces theme loads Google Maps API. You STILL require a Google Maps API key – but this should be applied to your Real Spaces theme as follows:
- Prevent Buying Buddy plugin from loading the Google Maps API
In the WordPress Plugins menu:
Click “settings” for the Buying Buddy plugin.
Under “Option Settings”, make sure you DISABLE (YES) the loading of Google Maps API by the Buying Buddy plugin.
Click “Update Options”. - Add your Google Maps API Key to the Real Spaces settings
Open the WordPress Real Spaces menu – then click the menu option for Map API Key.
On the panel shown, add your Google Map API key and “Save Changes”.
You may need to clear any cache.
Automatic Updates
As the Buying Buddy Plugin is currently not available via the WordPress plugin repository, you will not see messages with the plugin to update it.
The latest version of the Buying Buddy Plugin automatically checks each day and will update itself if a newer version exists.